All About Videos
Convert Videos to High Definition for Panasonic VIERA
Heart breaking news!!!: I went to a local electrical store yesterday (12 Oct 2010) to look for an Android phone or tablet (now into designing Android apps together with my 13 year old daughter) and tried to run my HD on SD card on a few Panasonic VIERA LCD / Plasma there. All of them can no longer play the HD videos - there's no Movie View option anymore!. The tutorial below seems to only work on older (2008 to early 2010 - bought mine early 2009, successfully tested HD on SD on VIERA early 2010) VIERA sets. The HD on SD card however, works on Panasonic Blu-Ray Player with SD card reader. The VIERA models tested was C series 36" and X series 42". Didn't test on Z series (maybe Z can run - I don't know). Mine is the X series, Plasma 42". We bought a Samsung Galaxy 5 Android phone there - RM699 (US$230).
Tutorial on Converting Videos to High Definition to run on Panasonic VIERA via SD card
1. Get a VIERA LCD, Plasma or LED TV
Obviously you'll need an LCD, Plasma or LED Panasonic VIERA TV of at least 42". Its getting cheap now. I got mine when it was expensive (around RM2900 or US$990). There are 4 reasons why I bought it:
(1) to play Nintendo Wii games,
(2) to experiment on HD via SD,
(3) to do quick preview from my Panasonic VideoCAM before I edit and
(4) to do a quick preview of my wife's Nikon DSLR pictures before we edit.
So far the VIERA has been running great for all that purposes. Why only VIERA? Its because only VIERA has built-in SD card reader. My VideoCAM, DSLR, SmartPhone, PhotoFrame, old PDAs, old digital cameras etc all use SD cards so there's abundant SD cards at home (from 128Mb to 16Gb, normal SD as well as microSD). Besides, its troublesome to transfer files from an SD card to thumbdrive just to preview the content. You can also purchase thumbdrive adapter and normal SD adapter to fit microSDs.
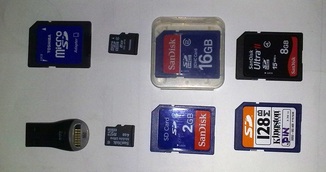
Various SD cards & SD Adapters
2. Get your HD videos / movies or self record them or rip from legal media for backup
Bear in mind that HD videos are normally huge in size. It will take more time to process HD than normal Standard Definition (DVD). However, once you got it, test it on VLC Player or MPlayer. Most HD movies comes with High Definition audio as well. These are 5:1 channel (6 speakers) or 6:1 channel (7 speakers) and normally encoded as AC3 or DTS.
My MPlayer has problems playing AC3 audio, so for HD we have to rely on VLC. Test play the video and rename it to MovieName720-rTime or MovieName1080-fTime (eg. TheMatrix720-f139, r is for 16:9 and f is for film (2.21:1) aspect ratio, 720 if the size is around 1280x720 and 1080 is full HD at 1920x1080, 139 is the movie length in minutes). Sometimes you get weird resolution such as 1536x640 (eg. as in TheMatrix720-f139) which can be categorized as a 720. There's is no such thing as a 4:3 aspect for HD.
3. Convert to a format WinFF can process (optional - only if WinFF cannot do it directly)
Not all format WinFF can process. Normally weird aspect ratio, weird resolutions and 5:1 and 6:1 audio channels are not convertable in WinFF. So I use RER HD Movie Converter. RER latest version is not freeware (time limited demo is available). The version I use i.e. RER HD Movie Converter 3.6.2.0207 was free. Anyway, when you convert in RER, consider the following:
a. Resolution - you may need to resize the movie to comply to standard HD resolution, normally fix length and unfix width. For our TheMatrix720-f136 1536x640, it should be 1280x532 (around 83% downsize). WinFF however can take the original resolution so there's no need to change. Doesn't have to use RER to change resolution, WinFF can also do it.
b. Aspect - some video comes with unspecified aspect or non-standard aspect. Use standard aspect 16:9 or 2.35:1 etc from the Edit menu of RER for a particular format. WinFF seems to be able to take in any aspect but cannot convert to non-standard aspect. Consider skipping RER and go directly to WinFF if aspect is acceptable to WinFF. Also consider putting padding top & bottom for film aspect in WinFF.
c. Format - RER can convert to many formats such as AVI, MKV, WMV, MP4 etc. All have their pros & cons. However, for best size and best quality, MP4 with H264 codec is the best but conversion time is longer. For fast processing, average size, average quality, WMV is OK. For editing use AVI with DIVX 5 compression. Most formats can be written by WinFF and does not have to go through RER.
d. Audio - For HD running on SD card, consider downgrading the audio to MPEG2 AAC format, stereo (2 channels) or AC3 stereo with resampling frequency of 48000 Hz and bitrate of at least 256 kb/s. RER is capable of increasing or decreasing audio +-50%. If source is stereo (2 channels), you can skip RER and go straight to WinFF.
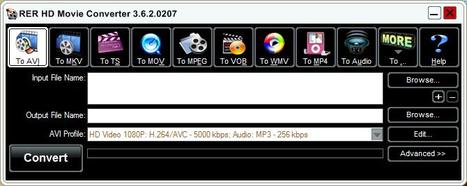
RER HD Converter
e. Video Codec - Compression method to minimize file size, enhance quality and playability. HD uncompressed will be too big in size. Some compression decoder can be built-in a player eg. DVD player with DIVX compatibility. Most popular now is H.264 or also called AVC codec. It however, is processing intensive and will take longer time to encode. Most codec can also be converted in WinFF directly.
f. Frame-rate - PAL TV system is 25 frame per second (fps), same as Europe. NTSC and SECAM are other TV systems used. We have to set our movie frame rate as 25fps. I've tried 24fps before, the bottom part of the VIERA TV screen will have noise when HD on SD 24 fps is running. For those not on PAL, test your fps first before converting whole movie. Frame-rate can also be converted using WinFF directly.
However, most movies or videos are already WinFF compatible (test them in WinFF first) and can be converted directly without going through this process (RER). Besides, converting a movie several times always degrade the quality. Try to minimize converting & reconverting videos.
4. Convert to VIERA compatible HD format using WinFF
We would like to convert the movie TheMatrix720-f139.mkv to VIERA compatible format in these characteristics:
a. 4 split videos of about 33 minutes each and the last segment at 31 minutes (33 x 3 + 31 = 130, last segment contains 25 seconds of credit only)
b. The split videos can easily form chapters in VIERA menu later (>>| Skip 4x on VIERA remote to next movie - another reason is that we need to ensure each segment is less than 4Gb - SD card may use FAT32 system)
c. Our target filename is the same as the original but with a,b,c or d at the end to denote different segments.
d. Target audio is still 48000 Hz but using HD compression audio codec AAC (MPEG2) at 256Kb/s
e. Target video resolution is 1280 x 720 with aspect of 16:9 (need padding of 94 pixel top & bottom - (720-532)/2 where 532 is actual movie height if length is proportionately scaled to 1280 from 1536)
f. Target video codec is MPEG4 with H.264 compression in PAL (our Malaysian TV system type, same as Europe) at 25 fps. Change fps if your system is not PAL.
g. Based on experience, a video bitrate of 6Mb/s or 6000 kb/s is sufficient for 720p HD for this movie. If the movie is 1080p Full HD, consider bitrate of 8Mb/s.
Fortunately, we have a preset that is almost perfect from The Rock (Sean Connery) movie. Only minor adjustments needed.
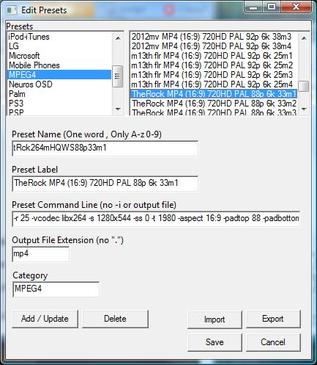
The Rock preset
Adjusted preset setting for our TheMatrix movie.
-r 25 -vcodec libx264 -s 1280x532 -ss 0 -t 1980 -aspect 16:9 -padtop 94 -padbottom 94 -flags +loop -cmp +chroma -deblockalpha 0 -deblockbeta 0 -b 6000k -maxrate 9000k -bufsize 4M -bt 256k -refs 1 -bf 3 -coder 1 -me_method umh -me_range 16 -subq 7 -partitions +parti4x4+parti8x8+partp8x8+partb8x8 -g 250 -keyint_min 25 -level 30 -qmin 10 -qmax 51 -qcomp 0.6 -trellis 2 -sc_threshold 40 -i_qfactor 0.71 -acodec libfaac -ab 256k -ar 48000 -ac 2
What it means is:
-r 25.00 = fps is 25, -vcodec libx264 = Video codec is H.264, -s 1280x532 = resolution is 1280 pixel by 532 pixel (532 is 720 - 94 x 2 for pad top & bottom), -ss 0 -t 1980 = start conversion from 0 second of movie and convert for 1980 seconds long (33 minutes, first segment of movie), -aspect 16:9 = HD aspect type, -padtop 94 -padbottom 94 = black padding of 94 pixels top & bottom, -b 6000k = video bitrate 6Mb/s, -acodec libfaac = audio codec is MPEG2 AAC, -ab 256k = audio bitrate is 256Kb/s, -ar 48000 = audio resample at 48000 Hz and -ac 2 = audio channel is stereo (2 channels).
There are many commands I have yet to understand, and I would suggest just using them (you can google their function under ffmpeg). If you don't have the preset above, load any one of the preset in MPEG4 category and edit the command line to match the above. Give it a preset name (one word, no spaces), preset label (can have spaces) and segment number (1 to 4) that is unique eg. label: Matrix MP4 (16:9) 720HD PAL 94p 6k 33m1 and then press Add / Update button and finally press Save button.
Then drag & drop the Matrix movie file onto the video list of WinFF, select MPEG4 in Convert to:, select your new preset above in Device Preset and specify directory to convert to in Output Folder. Press the Convert button. A text window should appear and conversion should start. If there's problem, the text window will list what it is. Converting a 10 minute 720 HD takes about 1 to 2 hours, our 33 minutes should take 5-6 hours!. Best to leave it processing overnight.
Once it finish converting, rename the TheMatrix720-f139.mp4 to TheMatrix720-f139a.mp4. It is now the first segment of The Matrix movie, in MP4 format. For next segment, just change -ss 0 -t 1980 to -ss 1980 -t 1980 (start from 33 min and stop after converting 33 minutes) and rename it to ..b.mp4. -ss 3960 -t 1980 for 3rd segment (..c.mp4) and -ss 5940 -t 1860 (31 minutes for last ..d.mp4 segment). Rename all presets ending with 1-4 for each segment. Convert your video 4 times and rename them 4 times as well (mpg4 videos, a to d). You should have 4 segments of The Matrix. Test play all files in sequence to see if their ends match.

Preset for The Matrix loaded
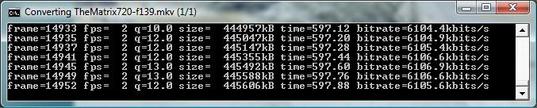
Converting shown in text
5. Generate AVCHD format from MP4 for SD card (playable on VIERA or Blu-Ray Player)
For this section, you'll need MultiAVCHD. It is a freeware that compiles MP4 or MKV into AVCHD format (standard HD format for HD VideoCam and Blu-Ray). The resulting AVCHD video can then be copied to SD Card or burn to DVD R or even BD R (Blu-Ray Disc). The SD card can then be viewed on the VideoCam or VIERA TVs (with some limitations)
Limitations of HD on SD card for VIERA:
a. Audio is Stereo only (2 channels) and on AC3 format only.
b. No menu (VIERA will just list the movies on the SD card and the selected thumbnail preview).
Open MultiAVCHD. Go to Media tab and drag & drop the movies / videos you converted to MP4 using WinFF. Set the destination path to save our AVCHD. Go to Author tab and set the TV system to PAL (or your other TV system). Accept defaults for others for now. Save your project and then click on Start button.
A window appears with choices of media for the AVCHD (from SD card to BD R). If we are playing directly on VIERA TV via SD card, click TV/Cam (PAL) button. The author is not familiar with other options (still yet to buy a Blu-Ray Player). MultiAVCHD will start processing.
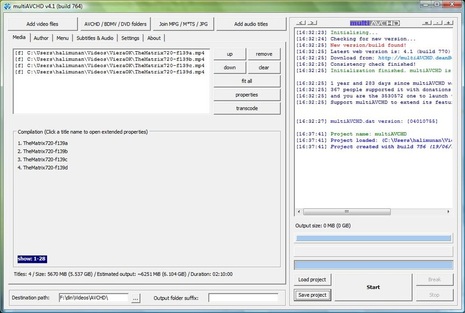
Video List in MultiAVCHD
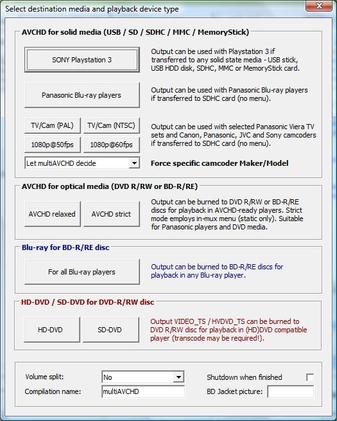
Options of Start button
6. Copy AVCHD folder to /PRIVATE in SD Card and play on VIERA
Once your AVCHD videos are created, they are inside a folder called /AVCHD (see your destination folder in MultiAVCHD). The actual streams (videos) are under /AVCHD/BDMV/STREAM folder, in files 000.MTS to 0(n).MTS (if 4 videos, it will be 000 to 003.MTS). Our TheMatrix should generate 4 MTS video streams. Test them in VLC Player.
Prep your SD card, make sure there's enough space for the /AVCHD content (check the size of the folder first). Mine is around 6.3Gb. It can fit on my 8Gb SD card. Normally conversion from MP4 H.264 to AVCHD will increase the size to about 5%. My MP4s of TheMatrix is around 6Gb. Create a folder /PRIVATE on the SD card (must be capital letters) and copy the /AVCHD into that folder.
Pop the SD card into the SD card reader in VIERA and an option menu appears on the TV: Select Picture View or Movie View. Select Movie View from TV's remote and a Video menu with our 4 chapters will appear. Select a chapter to play and press OK.
Backup all MP4 files (it can be reused later to compile to bigger SD card together with other movies). For 16Gb SD card, sometimes I can fit 4 movies eg. Amityville Horror, Cheetah Girls 1 World, Corpse Bride & Madagascar (see site's top page). Most of the time 16Gb can fit 3 movies. However, for movies Avatar and 2012, they already take up 14.8Gb! (both are very long and both are 1080 resolution).
End of tutorial: Convert videos to High Definition for Panasonic VIERA
See also: FAQ on Convert to HD for VIERA (will be up soon!)
