All About Videos
Converting Movies to Extended DVD Format (Long-Play Format)
In Malaysia, Recordable DVDs 4.7gb are abundant and can cost as little as RM0.80 (US$0.25) each. It would be good if we can encode DVD videos at high resolution and good quality onto these DVDs. What if we can cram 4 to 6 movies on one 4.7gb DVD? That's about 9 hours of video or about 7 hours more than Standard DVD video format. This can be achieved using Extended DVD video format (or DVD long play format) or called xDVD from here on. The final DVD video can be played on all consumer DVD players, as well as computers (of course!).
Tutorial on converting video into xDVD
1. Prepare your movies / videos
Get your movies / videos or self record them or rip from original media for backup.
After you prepare your movies, test them. Some common video players are VLC media player and MPlayer. Most use Windows Media Player but sometimes WMP won't play certain formats or audio. I normally rename these movies and add aspect type and length such as Predators-d-f102.mkv (Movie: Predators, d = DVD copy, f = film aspect ratio eg 720x304 and 102 = 102 minutes or 1 hour 42 minutes in length). Other examples are DscpblMe-t-r72.avi (Despicable Me, t = telesync or in-cinema camera copy i.e bad copy, r = regular aspect i.e 16:9 format i.e most common now and 72 minutes long). Another aspect ratio is t = television or old TV aspect ratio which is 4:3.
VLC and MPlayer are freewares.
Example of film aspect ratio (2.21:1)
regular 16:9 aspect ratio
2. Convert the movies to xDVD
For conversion to xDVD, I use WinFF. It is a freeware Graphical User Interface for a popular free video conversion command-line program called ffmpeg. It took me some time to tweak & fine tune the settings for best output, speed of conversion and quality. Basically, we need to convert from MKV, AVI or other formats to MPG2 format that is xDVD compatible, can be compiled to DVD Video with menu, is playable on most DVD players, is small in size but maintain DVD resolution & quality and in a format that should not be obsolete anytime soon. Emerging format is of course HD (High Definition) and HD conversion will be covered in future topic.
For conversion to xDVD, I use WinFF. It is a freeware Graphical User Interface for a popular free video conversion command-line program called ffmpeg. It took me some time to tweak & fine tune the settings for best output, speed of conversion and quality. Basically, we need to convert from MKV, AVI or other formats to MPG2 format that is xDVD compatible, can be compiled to DVD Video with menu, is playable on most DVD players, is small in size but maintain DVD resolution & quality and in a format that should not be obsolete anytime soon. Emerging format is of course HD (High Definition) and HD conversion will be covered in future topic.
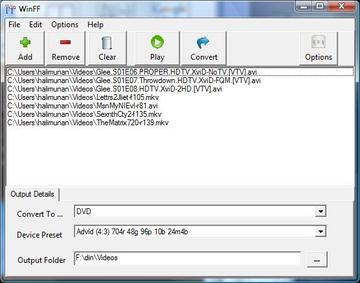
WinFF is GUI for ffmpeg
Let's say we are converting the movie The Matrix (1999 - Keanu Reeves). The original file is a HD. The following are the characteristics of the original movie:
a. Filename is TheMatrix720-f139.mkv (This is a 720p type of High Definition - movie height is around 720 pixels)
b. Resolution is 1536 x 640 (a bit weird resolution, the first number is normally either around 1280 or 1920 pixels, and the second number is either around 720 or 1080 pixels but the aspect ratio complies to film type around 2.21:1)
c. Sound is Stereo audio at 48000 Hz (WinFF cannot convert 5:1 or 6:1 audio channels, this movie has 2 channels only)
d. File size is 4.2Gb (HD movies are normally in very high size, but there are compression methods to compress HD at smaller sizes sometimes to 300-400Mb! but normally at slightly reduced quality)
e. Movie length is 139 minutes or 2 hours 19 minutes but normally we don't want the whole credits at the end, maybe around 20 seconds of it is enough. So the effective length to convert to xDVD is about 130 minutes (include about 25 seconds of credit)
f. Movie is 23.967 fps (frames per second, normal for HD)
The target conversion we want has the following characteristics:
a. 4 split videos of about 33 minutes each and the last segment at 31 minutes (33 x 3 + 31 = 130)
b. The split videos can easily form chapters in DVD menu later (>>| Skip 4x on DVD player remote to next movie)
c. Our target filename is similar to the original but with a,b,c or d at the end to denote different segments.
d. Target audio is still 48000 Hz but using high compression audio codec mp2 (MPEG1 Layer 2) at 192Kb/s
e. Target video resolution is 704 x 576 with aspect of 4:3 (play mode normal on older TV which usually has non-adjustable aspect, or for LCD TVs with adjustable ratio which can zoom to fit width of LCD)
f. Target video codec is MPEG2 (or MPEG-PS) at PAL (our Malaysian TV system type, same as Europe) at 25 fps.
g. To fit a film aspect 2.21:1 into a 4:3 aspect, we need to pad the top & bottom of the video at 128 pixels each (128 pixels height of black band on top and 128 pixels for bottom)
h. Based on experience, a video bitrate of 1Mb/s or 1000 kb/s is sufficient for xDVD for this movie.
i. We need to use GOP of 48 (generalization of packet - 48 frames per color map) to reduce the file size further.
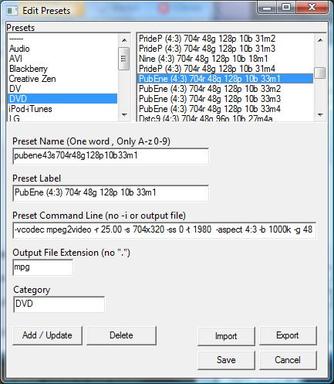
Preset conversion in WinFF
Fortunately I already have a perfect conversion preset that match what we want. It was for a movie Public Enemy. The preset command line is as follows:
-vcodec mpeg2video -r 25.00 -s 704x320 -ss 0 -t 1980 -aspect 4:3 -b 1000k -g 48 -bf 2 -b_strategy 1 -padtop 128 -padbottom 128 -mbd rd -trellis -mv0 -cmp 2 -subcmp 2 -acodec mp2 -ab 192k -ar 48000 -ac 2
What it means is:
-vcodec mpeg2video = Video codec is mpeg2, -r 25.00 = fps is 25, -s 704x320 = resolution is 704 pixel by 320 pixel (320 is 576 - 128 x 2 for pad top & bottom), -ss 0 -t 1980 = start conversion from 0 second of movie and convert for 1980 seconds long (33 minutes, first segment of movie), -aspect 4:3 = old TV aspect type, -b 1000k = video bitrate 1Mb/s, -g 48 = GOP at 48 frames, -padtop 128 -padbottom 128 = black padding of 128 pixels top & bottom, -acodec mp2 = audio codec is MPEG1 Layer 2, -ab 192k = audio bitrate is 192Kb/s, -ar 48000 = audio resample at 48000 Hz and -ac 2 = audio channel is stereo (2 channels).
Some commands I have yet to understand are -bf, -b_strategy, -mbd etc (if anyone knows what they are, feel free to msg me). If you don't have the preset above, load any one of the preset in DVD category and edit the command line to match the above. Give it a preset name (one word, no spaces), label (can have spaces) and segment number (1 to 4) that is unique and then press Add / Update button and finally press Save button.
Then drag & drop the Matrix movie file onto the video list of WinFF, select DVD in Convert to:, select your new preset above in Device Preset and specify directory to convert to in Output Folder. Press the Convert button. A text window should appear and conversion should start. If there's problem, the text window will list what it is.
Once it finish converting, rename the TheMatrix720-f139.mpg to TheMatrix-f139a.mpg. It is now the first segment of The Matrix movie, in xDVD format. For next segment, just change -ss 0 -t 1980 to -ss 1980 -t 1980 (start from 33 min and stop after converting 33 minutes) and rename it to ..b.mpg. -ss 3960 -t 1980 for 3rd segment (..c.mpg) and -ss 5940 -t 1860 (31 minutes for last ..d.mpg segment). Rename all presets ending with 1-4 for each segment. Convert your video 4 times and rename them 4 times as well (mpg2 videos, a to d). You should have 4 segments of The Matrix. Test play all files in sequence to see if their ends match.
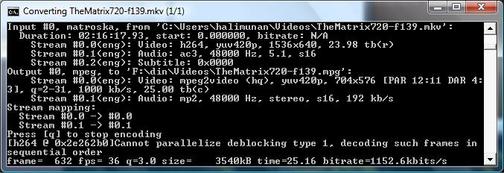
Conversion in progress
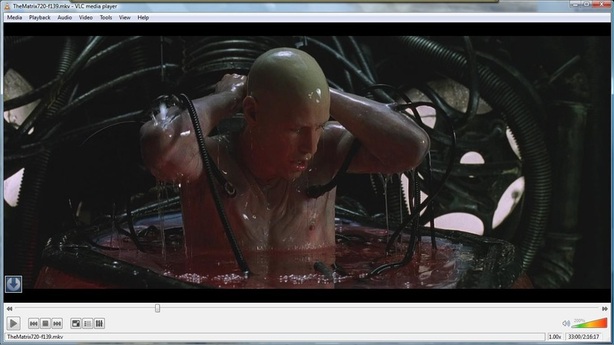
Original The Matrix in HD
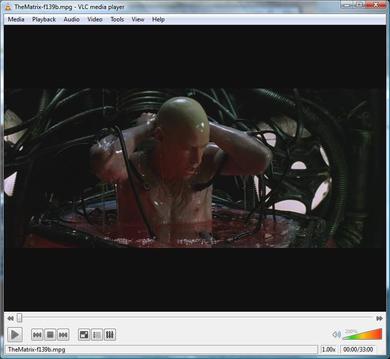
Converted The Matrix in xDVD
3. Compile xDVD mpgs to DVD Video with menu
It is assumed that you have converted several movies or videos already and the total mpg size for all of the movies is less than 4.2Gb. The DVD menu and video previews will take some space on the DVD and the extra space on the DVD is for that purpose. So far, the only DVD authoring software I know of that can compile Extended DVD format is The MPEG Encoder DVD Author or TMPGEnc. TMPGEnc I use is version 1.5.19.59 (2003-2004) by Pegasys and it is not a freeware. There are newer versions but I don't know how they will work. Please get TMPGEnc to proceed. I've tried many freewares and so far, all of them failed to compile xDVD format. I will continue searching for a free alternative to TMPGEnc.
It is assumed that you have converted several movies or videos already and the total mpg size for all of the movies is less than 4.2Gb. The DVD menu and video previews will take some space on the DVD and the extra space on the DVD is for that purpose. So far, the only DVD authoring software I know of that can compile Extended DVD format is The MPEG Encoder DVD Author or TMPGEnc. TMPGEnc I use is version 1.5.19.59 (2003-2004) by Pegasys and it is not a freeware. There are newer versions but I don't know how they will work. Please get TMPGEnc to proceed. I've tried many freewares and so far, all of them failed to compile xDVD format. I will continue searching for a free alternative to TMPGEnc.
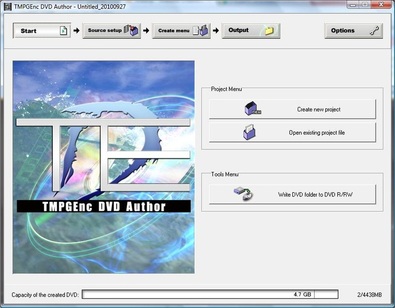
TMPGEnc DVD Author
I already have templates for various types of DVD videos but for this exercise, we'll start from scratch. Click Create New Project button. Drag & drop one set of movie (4 segments) into the file list (example: segments from movie Agent Cody Banks 2. You'll get an error message "TMpgEnc DVD Author has encountered a problem" and says that bitrate is too high and GOP is too long, proceed by clicking the Ignore button and Yes to create non-standard DVD. This four segments are now in Track 1 of the DVD. Click settings under Untitled Track 1 and rename the Track Name to the movie name eg. Agt Cody Banks 2. Proceed by adding a new Track and drag & drop another movie into it. Rename the track & proceed to Track 3, 4 etc until the bar below is close to the 4.7 Gb capacity. I usually named the tracks in abbreviated form (it will be used as a label too). Save your DVD compilation project by going to Options button and Save Project As and then give it a name eg. acody2-matrx.tda.
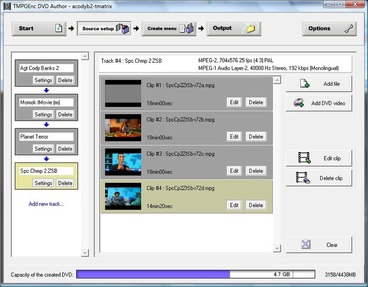
4 tracks loaded on the DVD
We'll continue to create menu for our DVD. TMpgEnc has quite easy menu authoring. After all tracks are filled, click Create Menu button. You'll get a boring menu with just a Title, Play all tracks and Select Track options. Revamp the menu by clicking Edit Menu Theme button. Select Yes to proceed. For Layout of Main Menu = select a page with 5 boxes (assuming you have 5 tracks / movies) and for Layout of Track Menu = select a page with 4 boxes (we have 4 chapters per movie) then OK. Next is to edit Menu Display Settings, click the button. In tab Motion Menu, check the Use Motion Menu (enable 15 second animation for each track and chapter) then OK. Click on Edit button at the bottom and select Specify Background Image for all Pages. Select an image as background. Go to the Main Menu and click Edit button again and select Specify Background Image, select a different image. Lastly, click on the Main Menu Title and change the Title eg. Movies Collection, turn on Bold and change the text color. We'll use default for everything else for now.
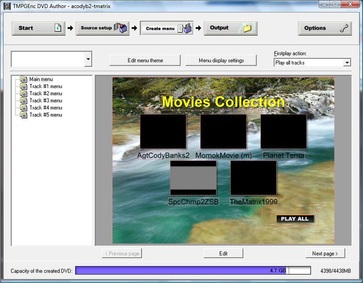
Main Menu (Tracks Selection)
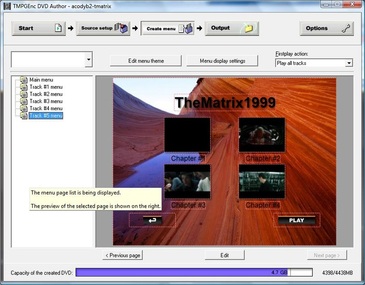
Track Menu (Chapter selection)
One final edit before compilation and burning. Go to Main Menu & click on the first movie 'box'. Drag the slider until the title of the movie appears. Do for all other movies as well. Now we are ready to compile the xDVD and burn it. Oh wait!, last-last thing, the First Play Action should be Display Main Menu (so we can see our menu upon loading).
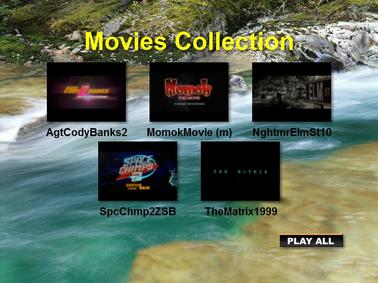
Final Menu of the xDVD
Now let's compile the xDVD video. Click Output button, take note of the output folder (normally ../Documents/TMpgEnc DVD) and press Begin Output button. Another error window appears saying that "bitrate exceeds upper limit", just press Ignore and Yes to continue. Wait until the DVD compilation is done and a window appear saying Outputting Complete. Pop in a blank DVD R, cancel any programs that try to format or access the blank DVD, go back to TMpgEnc and press Open DVD Writing Tool. A DVD Writing Tool opens, the DVD compilation already loaded. Specify a label eg. ACODY2_MATRIX (some DVD Player uses strict labeling method with all letters capitalized and no space, symbols or dash) and press Write DVD. When finish, the DVD will eject from tray and a dialog box will say Writing OK!. Press OK to continue. Test the video in your computer and DVD Player. Label the DVD.
You can also burn the xDVD compilation using Nero. Use DVD-Video option, make sure it burn with Disc-At-Once and No-Files-Modified options.
If you want to keep a backup of the compilation, burn the files in ../Documents/TMpgEnc DVD/volume1 folder (subsequent compilation will create volume2, 3 etc) , and mark it as DVD compilation and maybe write a list of the movies in the compilation. To burn another copy of the DVD, copy the /volume1 folder to computer and open TMpgEnc and click Write DVD folder to DVD, and select the volume1 folder to burn.
End of Topic: Tutorial on converting video into xDVD
See also: FAQ on converting video into xDVD
Disclaimer: The writer does not condone downloading illegal copies of copyrighted materials over the Internet especially to make profit and for public viewing or usage. The techniques above is knowledge sharing for any video material including those self recorded or making backup of own legal movie collection.

